Something that has really helped with plans as I transition to CI this year is having a set routine in class. On Mondays we have Weekend Chat, Tuesdays we do FVR, Wednesdays we use Música Miércoles, Thursdays we do Persona Especial, and on Fridays we do a Picture Talk or a Movie Talk. This means that as I’m staring at a blank plan book, it’s never actually blank! There’s always a solid start to class, and students know what to expect.
I’m really enjoying Picture Talk as a routine! It’s super flexible, easy to implement into any curriculum, and it works well for any classroom!
How to Picture Talk Video Tutorial
How to Picture Talk:
- Find a picture
- Add visual supports
- Project the image and talk about it in the target language
Find a Picture
The picture should show something you want to talk about. So, if you’ve been talking about family, you could find an awkward family photo to share. I usually find it extra fun if it’s a goofy picture, but you can certainly do this with more serious topics too!
You can use your own pictures, or any static images you like. Old photos can generate a lot of conversation, or photos that show culture and different lifestyles in Spanish-speaking countries. This Pinterest board is full of cartoon-y options you could choose from!
Social media is also a great source of images. As I mentioned in my finding authentic resources blog post, there are a ton of great profiles out there you can use.
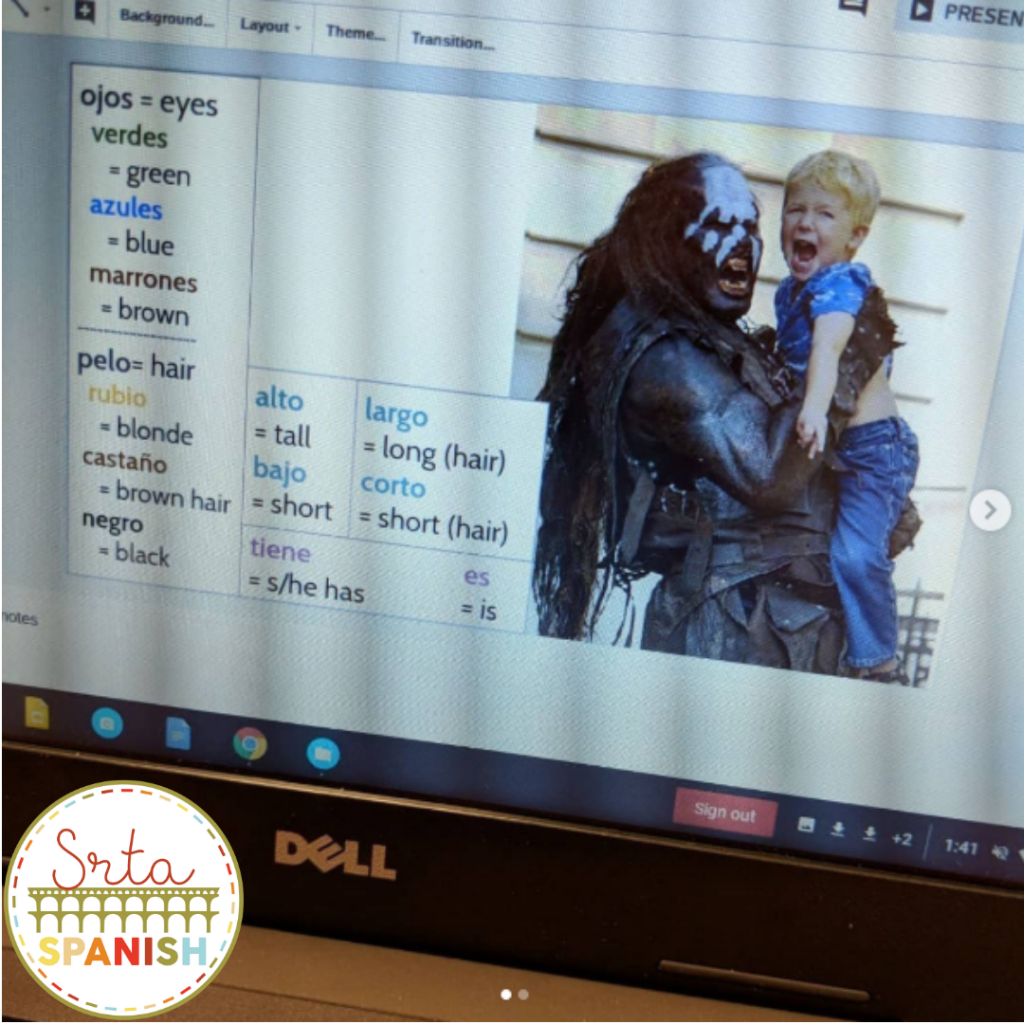
New Vocabulary
If you’ve never taught the vocab or structures you want to use, add visual supports. I like to put them in my Slides, because it helps me remember what my plan was. You can also write them out on your white board as you go!
The example below is from my free Thanksgiving Movie Talk, but it shows how I like to set up a slide with the visual supports for students.

Project the Image
Project the image, making statements while pointing and pausing, using your vocabulary supports. If you have an interactive whiteboard, you can write right on the picture as you describe it. Students can use prior knowledge as you talk about it with them.
Ask questions about the picture and about the statements you’ve made about the picture. Students answer as a class, or you can ask individuals. Essentially, circle the statements. Here’s a post about How to Circle!
Creative Ways to Picture Talk
I like to “reveal” the picture piece by piece. We talk about what’s visible, then reveal the next piece. I find it keeps students hooked, wanting to find out what the picture is!
Check out the post for a video example!
Movie Talk vs Picture Talk
A Movie Talk and a Picture Talk are very similar. The main difference is the source for the talk – a movie, clip, or static images. Some people like to play and pause the movie while they talk about it, but I have found that interactive whiteboards can be touchy. For ease of use I prefer to take screenshots and then talk about them like a photo talk or picture talk. Totally up to you and how you want the class period to go!

Follow Up Activities
After you do a picture talk, there are several follow up activities you could do. One option is to do a write and discuss, and write up a short paragraph working together as a whole class. Afterwards, you’ll have a short comprehensible reading you can use with any number of reading activities!

You can also have students work in small groups to do a “spin off” of the picture talk – what happened next? what happened before this? If that is too much output for their level, you can have them work together or independently to write statements about the picture.
Exit tickets are a great way to check for comprehension at the end of the class period. This blog post is full of ideas for different exit tickets you can do with your students, but my favorite is a simple true/false statement based on the conversation you had in the target language!
Ready to try your own Picture Talk?
Now that you have the basic idea, it’s time to try it out! I’ve put together a sample set of Google Slides that have a Picture Talk you can use in novice Spanish classes. They are set up to practice colors and clothing, but as I mentioned before, you can talk about whatever you want from the pictures!
Our district covers clothing and colors in the beginning of Spanish I, right around the end of September and October each year so the main feature is animals wearing goofy costumes. I hope your students love it!
If you use these, I’d love to see them in action! Tag me on Instagram @srta_spanish, or on Twitter!
Looking for more?
Jump in the conversation!
Do you have any questions for me? What are your thoughts on this strategy?
More Daily Routines for Spanish Class
As I mentioned at the beginning of this post, this is a routine we do regularly. Check out the other routines I like to use in my classroom in this post!


-
Sale!

Spanish Cognates Lesson Plans 1st Day of Spanish Class & First Week of School
Original price was: $22.11.$14.49Current price is: $14.49. Add to cart -
Sale!

Back to School BUNDLE
Original price was: $19.30.$15.65Current price is: $15.65. Add to cart -
Sale!
Back to School Spanish Starter Pack
Original price was: $8.45.$5.59Current price is: $5.59. Add to cart -
Sale!
RAINBOW Classroom Decor BUNDLE
Original price was: $18.41.$12.45Current price is: $12.45. Add to cart

13 Responses
So cute! Thank you for sharing! ???
I’m glad you like them! Let me know how they go!
I love how you display only a portion of the picture and do a slow reveal to build suspense!
It really helps build the interest!
I love the idea of the slow reveal. Question: How do you do that!?
Second question: WHere do you find funny pics? Do you have a preferred source or do you just google “funny images” and such?
Thanks for taking time to blog and respond!
Thanks for reaching out! The slow reveal is WAY lower tech than it looks – I just have a bunch of boxes (Insert>shape in Slides or Powerpoint) and then slowly delete the boxes. So one reveal usually happens over 5-10 different slides. As you tap through your slides, more of the image is available!
I don’t have a source I go to most! Google is great, but also I find lots of pics just scrolling the web and in different teacher Facebook groups!
Hello,
I’m knee deep into learning more about CI and have purchased SOMOS 1. I plan to incorporate this into my lessons with some of my classes this year. My question is that I teach an exploratory class in a small Catholic school and I teach grades PK-Gr. 8. I meet with each class once per week, most for only 30 minutes and 40 minutes for Gr. 5-8. While I love the ideas of “Mondays – What did you do this weekend”, “Tuesdays – story day”, “Music Wednesdays…” etc. I don’t see my students every day – just once a week. I would really appreciate some guidance on how I could incorporate many of the ideas I’m seeing here into a once-a-week curriculum. Thank you!
Hi Cheryl! I’ve never taught in a once-a-week setting like you are describing. I think what I would do in your shoes would be to pick a routine per level and do it when I see them – so my 5th graders might do the music routine, my 6th graders might do Persona Especial, and so on. This way each level would eventually use the routine. I hope that helps!
i am in the same boat with the quantity and time i see my k-8 students. It is tough to have them remember and practice any of the vocabulary they are introduced to.